|
|
|
|
TutorialTable of contents
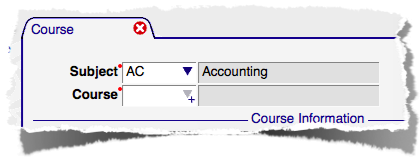
FormsInformation contained in the student database is created, viewed and modified using forms. Each form is designed to manage information from a specific functional area of the database, and typically covers one or two closely related types of records. The Person form, for example, is used to manage biographical information and includes basic information like date of birth and gender, along with address information. Individual forms will never manage information from multiple functional areas. This restriction helps keep information more logically organized, and makes security easier to manage. A form may display information from another area when appropriate, but updates to that information aren't possible. The Award Package form for financial aid is a good example; it displays a summary of student data that is relevant to their receiving financial aid awards, but the information can't be modified. Form ElementsAll forms display and manage information in similar ways, and this tutorial covers topics that are common to how all forms operate. Understanding and using the large number of forms that are part of the student database is easier than you may expect, mainly because they all operate in a similar way. The Course form provides a good example of how forms work. It includes most of the elements used in all forms. We'll cover other elements using the (???) form later. If you haven't read the Overview already, please take the time now to do so. Many aspects of how forms work are covered there and may not be repeated below. Key ValuesThe Course form manages information in the course catalog, which include course titles, credits, co- and pre-requisites, and course fees. Each course is identified by a unique combination of a subject and course number. Subject and course number are "key values" on the Course form, used to identify one specific course to create, display, or modify its information.
The Course field is also a select list, but its contents are related to Subject. When forms have multiple key values, they become increasingly specific as they're listed from left to right or top to bottom. The Course list only contains values for courses with the Subject you've already entered. In the example above, no Accounting courses exist to the list is empty (indicated by the grey triangle). If you are displaying or modifying an existing course you can select it from the list. If you're creating a new course you can simply type in the course number (note that this select field has a + next to the triangle to indicate that new values may be added). Both Subject and Course are required fields (indicated by the red dot next to the field label). Since both are key values, both must be specified before any data may be entered in the remainder of the form. FieldsThe details for each course are entered in various fields in the Course Information portion of the form. Each field will expect a specific type of information to be supplied, and some may be validated.
The Credits fields (Min and Max) expect numbers. Note that only Min is required. All numeric fields will have a limit on the size of the value entered, and will reformat what you enter to a field-specific precision. Credits, for example, have one place to the right of the decimal and must be less than 100. Title is a normal text field. It will have a limit on how many characters of data it can hold, but isn't checked or limited in any other way. Description is similar, but can accept much more information. Both are required. In this example we're creating a new record for AC 131, which the icon to the left of the Level field indicates. Each grouping of information will have an indication of whether the data is new, modified, or locked. TablesFurther down the Course form we have a table of Course Requisites. Tables are built using fields exactly like those we found elsewhere on the Course form.
In this example, we're creating a new Requisite, so the row number is amber to indicate that it has not been saved to the database. Tables show any unsaved changes, including deleted rows, with the same amber row number. The right-most column is the delete control. Checking the delete indicator in a table row will indicate that record should be deleted when the form is submitted. Controls
The Reset button removes all data from the form and resets it for entry of new information. If you have changed or added any information, you'll be prompted to verify that you want to discard the changes; clicking Cancel will return you to the form and allow changes to be saved. The Submit button requests any new, modified, or deleted data to be recorded in the database. Until submitted, any changes or additions you've made have not been recorded in the database. If anything prevents the changes from being recorded, you should be alerted to the nature of the problem. Indicators on the form (icons, etc) indicating pending changes will only disappear when data has successfully be saved. Some forms also have a Print button to allow the form contents to be sent to a printer. Only forms built specifically to support printing will have this button. If the form or your access don't allow changes to data, the Submit button won't be displayed. |
 The top of the Course form contains two select lists. The first, labeled Subject, contains a list of all the
 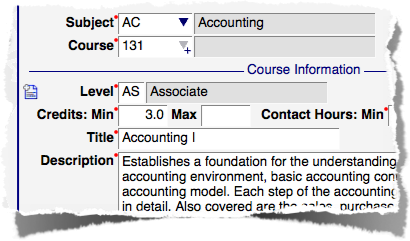 Level is a validated field and is required (it has that red dot). Most validated fields show a description to their right, which can't be modified. The list of valid level codes can be found on the
 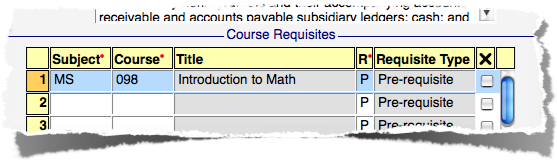 Requisites are other courses that must be taken before or concurrently with a course. As described above, courses are identified with a unique combination of subject and course, so each requisite includes that information and a Requisite Type of P (pre-requisite) or C (co-requisite). Subject is a validated field, and the combination of Subject and Course must match an known course. Title is the course title for the MS 098, in this example.
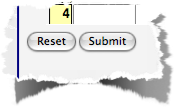 All forms have a set of buttons at the bottom of the form to perfom common tasks.